Introduction
When using the AVxcelerate toolchain, you need to use the REST APIs to connect the different components and share information with one another. First you will use Simulation Framework to create custom activities and a Simulation Loop, you will then use the SUT REST API to connect the Simulation Loop to your System Under Test (SUT) that will be the base of your simulation. The SUT REST API allows you to import the Simulation Framework configuration file, that will be selected later during the configuration of the simulation on the Explore application. The SUT REST API allows you to manage the SUT configuration files within the toolchain.
Once this is done, you will use the Scenario Manager application to import Logical Scenarios and Assets (assets are complementary configuration files, such as Maps) into the toolchain. You will use the Scenario Manager REST API to manage these logical scenarios and assets.
Once the Logical scenario is imported, you will use the Explore & Analyze interface to configure each simulation according to your development goals. Each simulation will be configured to reflect the aspect of the automotive function that requires testing. In order to manage all the files and information that will be made available with the Explore & Analyze application, you will need to use the Explore & Analyze REST API.
This REST API is used to manage the data available with the Scenario Manager.
The REST API provides endpoints to manage Logical Scenarios and assets: import in bulk, update, retrieve complete lists or specific version, check existing logical scenarios. But also, create, upload new KPI files, update existing or retrieve lists of KPIs. You can manage the Logical scenario groups, groupTypes and requirements that will allow smoother management for large scale simulations. Check the inventory (retrieve a list of catalogs and map files, etc.)
Please refer to the Scenario Manager and Explore and Analyze User and Safety manual available on the Ansys documentation portal for examples of how to use the available REST API features.

Authentication
Generating Token for REST API Authentication.
To generate a token, run the following command from your terminal:
$ curl \

  -d "client_id=tsalsm-rest-api" \

  -d "client_secret=<redacted>" \

  -d "username=avx-toolchain-user" \

  -d "password=<redacted>" \

  -d "scope=offline_access" \

  -d "grant_type=password" \

  "http://explore.apps.YOURCUSTOMURL.com/auth/realms/avx/protocol/openid-connect/token"
The output should be the following: copy and save the generated token so that you use it to authenticate.
{

  "access_token": "eyJhbGciOiJSUzI1NiIsInR5cCIgOiAiSldUIiwia2lkIiA6ICJrQWVwLWVZNVNRVlRIMHhqNUFBMXM3U19IeGpRSmxLckNLcE51STFLQkxNIn0.eyJleHAiOjE2ODc0NDA5NzIsImlhdCI6MTY4NzQ0MDY3MiwianRpIjoiYjhkOWFlMWYtMTZmMy00NDM1LTk0MzItYmJjN2NhZWE5NDQ3IiwiaXNzIjoiaHR0cHM6Ly9leHBsb3JlLnN0YWdlLmFwcHMuZnJpc2JlZWRldi5jb20vYXV0aC9yZWFsbXMvYXZ4IiwiYXVkIjoiYWNjb3VudCIsInN1YiI6ImI1NGVhODZkLTkzMjUtNDYwZi1iMDdhLTJlOTBlMmQwNmJiZiIsInR5cCI6IkJlYXJlciIsImF6cCI6InRzYWxzbS1yZXN0LWFwaSIsInNlc3Npb25fc3RhdGUiOiI5YTE2Y2U5NC0xMTY5LTQzY2MtYjYyNS01ZTAxNTc3ZTNkNDYiLCJhY3IiOiIxIiwicmVhbG1fYWNjZXNzIjp7InJvbGVzIjpbIm9mZmxpbmVfYWNjZXNzIiwidW1hX2F1dGhvcml6YXRpb24iLCJkZWZhdWx0LXJvbGVzLWF2eCJdfSwicmVzb3VyY2VfYWNjZXNzIjp7ImFjY291bnQiOnsicm9sZXMiOlsibWFuYWdlLWFjY291bnQiLCJtYW5hZ2UtYWNjb3VudC1saW5rcyIsInZpZXctcHJvZmlsZSJdfX0sInNjb3BlIjoib2ZmbGluZV9hY2Nlc3MgZW1haWwgcHJvZmlsZSIsInNpZCI6IjlhMTZjZTk0LTExNjktNDNjYy1iNjI1LTVlMDE1NzdlM2Q0NiIsImVtYWlsX3ZlcmlmaWVkIjp0cnVlLCJwcmVmZXJyZWRfdXNlcm5hbWUiOiJhdngtdG9vbGNoYWluLXVzZXIiLCJnaXZlbl9uYW1lIjoiIiwiZmFtaWx5X25hbWUiOiIiLCJlbWFpbCI6InRzYWxzbUBhbnN5cy5jb20ifQ.mk5-FqoMvbPeUSRRc3kVicAVt2U-xSYRVmzFwVeDKbcYlJMD551EYf9dzS2F9DBxPOoBDUyAdWyAov8Hj-VcscuMCpuPm9ikq6zf9sXOWCOlT3SYQIm7vHhb16_K1rtbAwRHlRPvyu4IAplj3SBsybkhUFQlSpWyRupl7Y80QZiaSoGviWh8EQabbhdSjzb-JFkOr7CZuQL4G5irpGjQDNa7zX6HzvQYpPWXrhYDpXItP2ZzEDHKIQAK-DUKIQyj8EfemEKx6BUbHquiC_n4f_VCIeGsr9pOPRK_5U87nzrE-rpzVsrFg77cURyX8cXFxfXYgDuB5KmbzLvz5mCxsQ",

  "expires_in": 300,

  "refresh_expires_in": 0,

  "refresh_token": "eyJhbGciOiJIUzI1NiIsInR5cCIgOiAiSldUIiwia2lkIiA6ICIwMmFkMjc0MS03MDc4LTRiYTktYTkyNy03NjhlZjRlYmM1YjcifQ.eyJpYXQiOjE2ODc0NDA2NzIsImp0aSI6ImMyMzhmOGY5LWViNGQtNGM5Yy05NWNjLWJjZmQ0MDhkMWFhNiIsImlzcyI6Imh0dHBzOi8vZXhwbG9yZS5zdGFnZS5hcHBzLmZyaXNiZWVkZXYuY29tL2F1dGgvcmVhbG1zL2F2eCIsImF1ZCI6Imh0dHBzOi8vZXhwbG9yZS5zdGFnZS5hcHBzLmZyaXNiZWVkZXYuY29tL2F1dGgvcmVhbG1zL2F2eCIsInN1YiI6ImI1NGVhODZkLTkzMjUtNDYwZi1iMDdhLTJlOTBlMmQwNmJiZiIsInR5cCI6Ik9mZmxpbmUiLCJhenAiOiJ0c2Fsc20tcmVzdC1hcGkiLCJzZXNzaW9uX3N0YXRlIjoiOWExNmNlOTQtMTE2OS00M2NjLWI2MjUtNWUwMTU3N2UzZDQ2Iiwic2NvcGUiOiJvZmZsaW5lX2FjY2VzcyBlbWFpbCBwcm9maWxlIiwic2lkIjoiOWExNmNlOTQtMTE2OS00M2NjLWI2MjUtNWUwMTU3N2UzZDQ2In0.wTrdeIoEoum8mMaam-eZerfPAywnb2LGr1Wsxv6tBYg",

  "token_type": "Bearer",

  "not-before-policy": 0,

  "session_state": "9a16ce94-1169-43cc-b625-5e01577e3d46",

  "scope": "offline_access email profile"

}
The mandatory attributes are `refresh_token` and `access_token`.
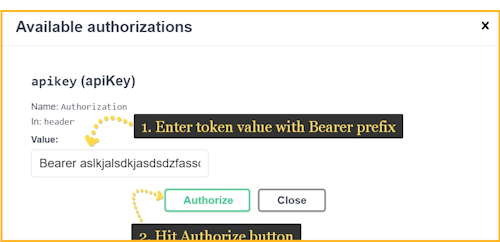
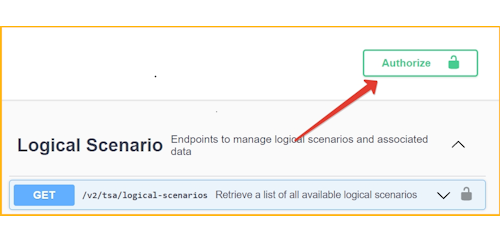
- Go to the REST API documentation page.
- Click Authorize.
- Enter Bearer in the Value field, with a space at the end. Then, insert the access token. Click Authorize once again.