Documentation
Last update: 16.07.2025Introduction
This document is intended for developers who need to develop client applications communicating with AVxcelerate Sensors Simulator internal services in order to:
- integrate AVxcelerate Sensors Simulator (AVX) in their driving simulation application,
- integrate the System Under Test (SUT) into the simulation loop.
This document describes how AVX works and how to use it. The API is composed of different protocol buffer contracts and gRPC services. In this document, the usage of the API is demonstrated in some code snippets written in C# programming language. Samples written in C++ and Python programming languages are provided in the VSS API folder.
AVX overview
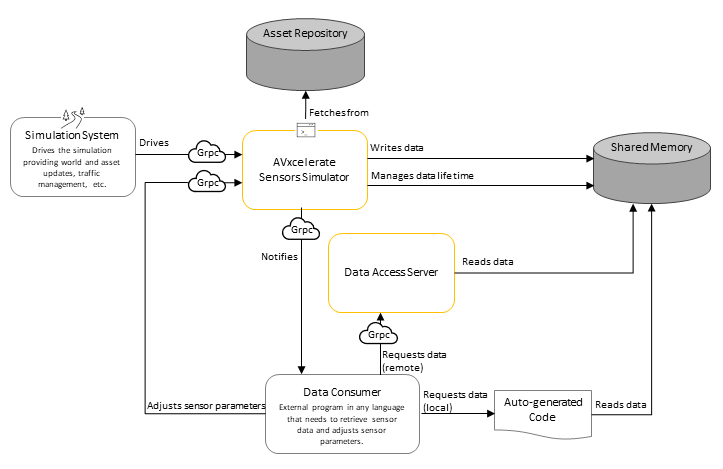
AVX embeds physics-based sensor models for camera, lidar and radar. It computes the sensor outputs from a virtual world model. The AVX step-by-step execution is driven by an external software (referred below as "Simulation System"). External components, for example perception algorithms, can interact with AVX through the data acquisition or sensor feedback control interfaces. In summary, the API contains different services which allow to:
- drive the sensors' simulation,
- adjust sensor parameters,
- being notified about new sensor data,
- request or read sensor data.
The API is designed to contain a minimum of simulation logic. This means that the responsibility for executing a blocking or a non-blocking loop is on the Simulation System side. AVX always waits until completion of each simulation command and sends back an acknowledgment when all components have been fully executed. It is the responsibility of the Simulation System to sequence the execution of all the software involved in the simulation (including AVX). In short terms AVX is totally passive in terms of simulation scheduling.
The AVX API is composed of different protocol buffer contracts and gRPC services defining the interface of AVX. In gRPC, a client application can directly call a method on a server application on a different machine as if it were a local object. Another benefit of using gRPC with protocol buffers is that the contract files (.proto) can be compiled into different programming languages.
The usage of the API is demonstrated in some samples provided in this document. These samples are written in C# programming language.
Services
Simulation Control
The Simulation service (exposed in the simulation.proto file) provides you with control procedures to monitor your simulation by requesting state transitions. The ResourceUploader service (exposed in the upload.proto file) allows you to upload resources as byte stream before loading them.
All possible states (started, loaded, running) and transitions (load/unload, initialize, update, stop and kill) of AVX during a simulation sequence are depicted in the following illustration.
AVX State Machine
Six control procedures (corresponding to AVX 6 possible state transitions) are provided in the Simulation service.
Note: AVX simulation sequence/logic always must be considered when using simulation control procedures to trigger state transitions. Procedures that are not consistent with the simulation transitions will end in error. Example of valid simulation sequence: LOAD > INIT > n UPDATE > STOP > UNLOAD > KILL
Prerequisite: When the track and/or assets are not files but byte streams, you must use the ResourceUploader procedure to upload resources before being able to load them. For more information, refer to the vss::simulation::ResourceUploader service.
LOAD: loads a new scene and configures simulation, sensors, and lighting systems. Always the first command.
-> AVX switches to LOADED state.
INIT: sets the scenario to its initial state (asset positions, date and time, etc.)
-> AVX switches to RUNNING state and is ready to receive updates.
UPDATE: applies a world update for a given simulation step and generates sensor data.
-> AVX remains in RUNNING state.
STOP: stops the simulation
-> AVX switches to LOADED state.
UNLOAD: allows to have a clear environment for a new simulation.
-> AVX switches to STARTED state.
- KILL: stops all AVX processes. The KILL command can be applied from any state. It can be used for example to end the simulation if there is a blocking problem. For a new simulation, AVX must be launched again after a KILL command.
Note: For more information on the state transition commands, please directly refer to the vss::simulation::Simulation service.
Uploading track and/or assets as stream
Instead of providing to AVxcelerate Sensors Simulator the path to the asset and/or track files in the Configuration message of the LOAD command, it is possible to upload those files and send their contents as a byte array using Grpc streaming capabilities. Refer to Implementation of ResourceUploader Client.
Sensors Feedback Control
The Feedback Control service (exposed in the feedback_control.proto file) allows you to update sensor parameters during the simulation. It can only be used when AVX is in RUNNING state and has been started with the –feedbackControl process argument.
The process (external software) you will develop will be running as a closed-loop simulation to update sensor parameters in real-time. It will retrieve sensor outputs, analyze them and if needed adjust them for the next output produced. The update of parameters sent to AVX will depend on your algorithms and defined thresholds.
Note: Updating one or several sensor parameters through the Feedback Control triggers a sensor reload. Thus, a certain latency (more or less significant depending on your configuration) can be observed for the updated frame to be generated. Only three parameters can be updated without requiring a sensor reload: the camera gain, exposure and time encoding.
The Feedback Control is available for the following sensor parameters:
All Sensors
Sensor Protection (Beta feature)
Note: Once enabled, the protection of a sensor cannot be undone. In the current release, this feature only has an effect on radar sensors. A Tx Waveform Report will not be generated for radars that are protected.
Camera Sensor
Focal length | Wavelength of Focal length | Chromatic Dispersion presets | Focal Shift | Aperture values | Distortion values | Imager resolution | Exposure time | Readout noise values | Thermal noise values | Native bit depth | Gain | Output mode values | Time encoding
Lidar Sensor
All lidar parameters.
For certain lidar parameters (rotating or flashing), the feedback control is only applied at the end of the frame: Rotation speed | Firing sequence | Firing frequency | Power | Responsivity | Aperture area | Pulse shape and duration | Max current | Max number of returns
Radar Sensor
All radar parameters except for:
- Antenna Tx/Rx: Ids | Polarization | Horizontal and Vertical power beam width | Pattern identity (File) | Peak gain
- Mode: Id | Multiplexing Type | Waveform | Center frequency | Transmission power
The Feedback Control also allows you to activate or deactivate a radar mode during the simulation.
Note: To know the modes IDs of the radars included in the sensor layout, you can read the sensor configuration or use the Sensor Labs.
Note: The complete list of available feedback control parameters can also directly be found in the proto file: vss::feedback_control::FeedbackControl service.
Lighting System Control
The Lighting System Control service allows you to retrieve and update lighting system parameters during the simulation. This service can only be accessed when AVX is in RUNNING state, has been started with the –lightingSystemControl process argument, and when a lighting system has been loaded during the simulation configuration.
Note: For more information and a complete list of available lighting system control parameters, please refer to the vss::lighting_system_control::LightingSystemControl service.
Sensor Data Access
The Sensor Data Access services allow an external software to be notified anytime sensor data is produced and to retrieve the data. The requested sensor response can then be parsed to be processed with your own algorithm.
Notifications
During the simulation, sensors produce data according to their assigned frequency. An external software can subscribe to the sensor data notifications stream using the SensorDataNotifier service. AVX then streams notifications to the subscriber when new sensor data is produced.
Notifications are sent in a SensorDataDescription message which contains all the needed information to identify and acquire the data produced by a sensor during a simulation step.
Depending on the output_splitting value in the simulation parameters (vss::simulation::SimulationParameters), a sensor can produce multiple data during one single simulation step. All unique data identifiers along with some metadata are stored in the repeated data_by_identifiers field. The metadata contains information about the publisher's host address, the data access server port if available, and the characteristics of the data. The metadata also allows identification and filtering to access only data of interest.
Note: The fields
data_idandmetadatain the messageSensorDataDescriptioncontain values only if the data is not split. They are deprecated and kept only to ensure backward compatibility. Please prefer using the fielddata_by_identifiersto access data identifiers and metadata.
Note: For a complete description of this service, please refer to the vss::data_access::SensorDataNotifier service.
Note: If
data_by_identifiersdoes not provide the data access server port, this means that the data is only available via shared memory.
Sensor Data Acquisition
During a simulation, the data produced by the sensors are added to a data store which holds the data in the shared memory. Once a notification about a new sensor output is received, the data can be requested using the unique data identifiers that are specified in the notifications.
Three different methods can be used to acquire the sensor data produced in a simulation:
- requesting it using the RPC vss::data_access::DataAccess::RequestData.
- requesting it through stream using the RPC vss::data_access::DataAccess::RequestDataStream.
- accessing it directly from the shared memory.
Accessing the sensor data directly from the shared memory is more performant than accessing it from the RPC. However, to access the data directly from the shared memory, the external software and AVX must be executed on the same machine. Accessing the data from the RPC through stream allows the user to bypass the 2 gigabytes limit from proto.
The AVX API contains some classes that implement the data access from the shared memory for Windows and Unix-based systems and for different programming languages (C#, C++, Python). This plugin allows you to use the same service definition for access from shared memory and access via RPC. For more details refer to vss::data_access::DataAccess and the Implementation of Sensor Data Acquisition section.
Data Retention
The data produced by the sensors are held in the data store until it is released. Not all the data generated by the sensors for all the simulation steps are held in the shared memory for the whole duration of the simulation in order to avoid overloading the memory.
By default, only the two last data blocks generated by each sensor are retained in the shared memory and accessible to the data consumer application. With this default behavior, when the data for the simulation step n is created, the data for the simulation step n-2 is erased. This behavior is equivalent to setting maxStoredData to 2.
You can opt for one of the following two strategies for data retention:
- defining the amount of data blocks that are stored in parallel for each sensor (by setting the
maxStoredDataparameter), - defining the lifetime for the data stored in the shared memory (by setting the
retentionTimeFrameparameter).
For more details, refer to Data Retention Strategy in AVxcelerate Sensors User's Guide.
The data retention strategy can be modified in the Imagine.Pre.VssSpawner.dll.config configuration file located in the AVX installation directory in VSS/VssSpawner. Refer to Configuring the Data Retention Strategy in AVxcelerate Sensors User's Guide.
Data Format
The sensor data stored in the shared memory is serialized using the vss::sensor_data::SensorData proto message. Therefore, the data buffer, received from the data request, must be parsed using this proto contract.
The Camera Output (Image) and Imager Output (Injection) of physics-based camera sensors can be stored unserialized by setting the sensor parameter serialize_data in vss::simulation::SimulationParameters to false.
By default, the sensor data contains all data produced by one single sensor during one simulation step. For example, the sensor data of a lidar sensor can contain point-cloud, waveform and contribution map data, depending on the simulation parameters provided during the loading phase. However, the data produced by a radar sensor can be split per mode or per transmitter, using the output_splitting field in the simulation parameters. In this case, the radar data are stored in shared memory as follows:
- MODE: for each mode one
SensorDatamessage is created containing the data of this single mode.
Note: When the Tx waveform report is activated and the data split per mode, one Tx waveform report will be contained in the data of each mode.
- TRANSMITTER: for each Tx antenna one
SensorDatamessage is created containing the data of this single Tx antenna
Note: When the Tx waveform report is activated and the data split per Tx, the same Tx waveform report will be contained in the data of each Tx antenna of one mode.
In the data notification, the field data_by_identifiers contains all data identifiers together with their metadata produced by one single sensor in one single simulation step.
Ground Truth Data Helper
The Ground Truth Data Helper service (exposed in the vss::ground_truth_access::GroundTruthDataHelper file) allows you to retrieve ground truth data from a sensor during a simulation. This service can only be accessed when AVX is in LOADED or RUNNING state.
-
Contribution dictionnary
If a lidar sensor is loaded in the simulation, with the contribution simulation parameter set to true, a contribution dictionary can be requested using the GetContributionDictionary rpc method, with a sensor identifier as parameter. The returned data is a ContributionDictionary (vss::ground_truth_access::ContributionDictionary).
-
Pixel segmentation tag color map
If a camera sensor is loaded in the simulation, with the generatePixelSegmentation parameter set to true, the tag/color map used by pixel segmentation algorithm can be requested using the GetPixelSegmentationTagColorMap rpc method. The returned message is a PixelSegmentationTagColorMap containing TagColorMap data.
Notes: >- Same TagColorMap data can be used in SimulationParameters.PixelSegmentationMapping to freely assign tag/color associations. All tags that are not associated with a color by the user are automatically assigned with a unique color by AvxSensors. >- The tag/color map is common to all camera sensors.
Implementation Examples
This section describes how to prepare your own component for interacting with the different AVX interfaces that were introduced above.
Before continuing reading, if you are not familiar with the basic principles of Protocol Buffers and gRPC, please read the getting started guides on:
Preliminary Steps
- Compile all the needed protobuf contracts. Please follow the instructions on the Protocol Buffers and gRPC websites. There are several tutorials and documentation available.
- Include the generated code into your project.
Then, you can start implementing your own logic.
The following sections will give you guidance on how to use the different interfaces of AVX. The sample code is given in C# programming language. If you're programming in another programming language you can adapt the code snippets with the help of the gRPC documentation which includes examples for different programming languages.
The AVX Internal gRPC Server
When AVX is launched with the argument -p for the port of the server, the AVX internal gRPC server listens for client requests on the specified host address and port.
Note: The port value must be an integer and you must ensure that this port is not in use or blocked by any firewall.
To use the services of the gRPC server to interact with AVX, you need to implement a new gRPC client connecting to the server through a channel (HTTP/2 connection).
-
Create a channel.
Here is an example in C# programming language:
Channel _channel = new Channel(hostName, portValue, ChannelCredentials.Insecure);try{_channel.ConnectAsync(DateTime.UtcNow.AddSeconds(5)).Wait();}catch (AggregateException e){Log.Error($"gRPC Channel failed to connect properly with host {hostName} and port {portValue}. Please check your AVX Server before connecting");throw new InvalidOperationException("gRPC connection failed", e);} - Wait 5 seconds, if the channel cannot be opened during this period, an error is raised.
Note: A gRPC channel should be reused when making gRPC calls. See also Performance best practices with gRPC.
This channel will be used in the following client implementation examples.
Implementation of Simulation Control Client
Prerequisites
- The preliminary steps are done: simulation.proto is compiled and included in your project.
- The gRPC channel is already created.
- AVX is started with the following process arguments:
- -p followed by the port of the AVX internal gRPC server
- when the client application will run on another machine, the -h | –host followed by the IP address of the machine on which AVX internal gRCP server is running.
Steps
-
Instantiate the
Simulation.SimulationClientclass from the gRPC channel. The classSimulationClientis generated from the protobuf contract which defines the serviceSimulation._client = new Simulation.SimulationClient(_channel); -
Use the client to send the different commands to AVX and receive back the command status. Make sure your command order is compliant with AVX State Machine.
// Example of usage of the STOP commandStatus status = _client.Stop(new Empty());if (status.Code == StatusCode.UnknownFailure){// Handle error casethrow new Exception($"Stop command failed to execute properly. Message: {status.Message}");}// status.Code == StatusCode.Success -> Simulation is stopped// ... -
Implement your logic according to your needs. Refer to the vss::simulation::Simulation service.
-
At the end of the simulation close the channel and dispose of all objects.
-
Implement an error processing that sends a KILL command to stop AVX properly if something goes wrong in your code, otherwise AVX processes will not be closed properly, thus preventing the application from restarting.
Note: LOAD must always be the first command sent to AVX, except if you use the UPLOAD command to upload the track and/or assets prior to the LOAD command.
KILL must be the last command sent to AVX.
Implementation of ResourceUploader Client
Instead of providing AVxcelerate Sensors Simulator with the path to the asset and/or track files in the Configuration message of the LOAD command, it is possible to upload those files and send their contents as a byte array using Grpc streaming capabilities.
In this case
- before the LOAD command, use the ResourceUploader service to send an UPLOAD command for each required track or asset. The metadata of the UPLOAD message allows to define an identifier for this resource.
- in the configuration message of the LOAD command, use this identifier as resourceIdentifier.
Note: A resource identifier shall be unique.
Steps
-
Instantiate the
ResourceUploader.ResourceUploaderClientclass from the gRPC channel. The classResourceUploaderClientis generated from the protobuf contract which defines the serviceResourceUploader._client = new ResourceUploader.ResourceUploaderClient(rpcChannel as RpcChannel); -
Before sending the LOAD command, upload the resource.
Note : In the example below the resource file is first open as stream, than byte arrays are extracted from this file stream to be sent using gRPC streaming. This example can apply to asset or track.
public async Task<Status> UploadResource(FilePath resourcePath, string resourceIdentifier){var uploadResourceCall = _client.UploadResource();// the first RequestStream should contain an identifier for the resource.await uploadResourceCall.RequestStream.WriteAsync(new UploadRequest{UploadMetadata = new UploadMetaData{ResourceIdentifier = resourceIdentifier}});// send the resource byte content (here we read the bytes from a file stream)await using var readStream = File.OpenRead(resourcePath);var buffer = new byte[1024 * 1024];int count;while ((count = await readStream.ReadAsync(buffer)) != 0){await uploadResourceCall.RequestStream.WriteAsync(new UploadRequest{Data = UnsafeByteOperations.UnsafeWrap(buffer.AsMemory(0, count))});}await uploadResourceCall.RequestStream.CompleteAsync();return await uploadResourceCall;} -
In the
Configurationmessage of the LOAD command, in thevss.ResourceIdentifierfield set the identifier of the track or asset used inUploadMetadata.
Implementation of Sensor Feedback Control
Prerequisites
- The preliminary steps are done: feedback_control.proto is compiled and included to your project.
- The gRPC channel is already created.
- AVX is started with the following process arguments:
- -p followed by the port of the AVX internal gRPC server
- when the client application will run on another machine, the -h | –host followed by the IP address of the machine on which AVX internal gRCP server is running.
- –feedbackControl
Steps
-
Instantiate the
FeedbackControl.FeedbackControlClientclass from the gRPC channel. The classFeedbackControlClientis generated from the protobuf contract which defines the serviceFeedbackControl._client = new FeedbackControl.FeedbackControlClient(_channel); -
Wait for the simulation to be in Running state, see AVX State Machine above.
-
At any time in Running state, you can send a request to adjust sensor parameters by calling the
FeedbackControl.FeedbackControlClient.Send()method with appropriate parameters and get the feedback status:// Example for cameraFeedbackControl feedback = new FeedbackControl{sensorId = "vehicle_front_camera",feedbackControlCameraParameters = new FeedbackControlCameraParameters{gain = 1.3,injectionTime = 100}};Status status = _client.Send(feedback);if (status.Code == StatusCode.UnknownFailure){// Handle error casethrow new Exception($"Send feed back command failed. Message: {status.Message}");}// status.Code == StatusCode.Success -> go on with your logic -
Implement your logic according to your needs. Refer to the vss::feedback_control::FeedbackControl service.
Note: The sensor_id must be filled for each request. The id must match the sensor id as defined in the sensor configuration given to AVX. Otherwise, you will receive an error status.
Note: At least one of the sensor parameter must be provided at each call. You can also provide multiple parameters for one sensor in a single request.
Implementation of Lighting System Feedback Control
Prerequisites
- The preliminary steps are done: lighting_system_control.proto is compiled and included in your project.
- The gRPC channel is already created.
- AVX is started with the following process arguments:
- -p followed by the port of the AVX internal gRPC server
- when the client application will run on another machine, the -h | –host followed by the IP address of the machine on which AVX internal gRCP server is running.
- –lightingSystemControl
Steps
-
Instantiate the
LightingSystemControl.LightingSystemControlClientclass from the gRPC channel. The classLightingSystemControlClientis generated from the protobuf contract which defines the serviceLightingSystemControl._client = new LightingSystemControl.LightingSystemControlClient(_channel); -
Wait for the simulation to be in Running state, see AVX State Machine above.
-
At any time in Running state you can send a:
- Set request to update lighting system parameters by calling the
LightingSystemControl.LightingSystemControlClient.Set()method with appropriate parameters and get the feedback status. - Get request to retrieve the current lighting system state by calling the
LightingSystemControl.LightingSystemControlClient.Set()method with appropriate parameters.
- Set request to update lighting system parameters by calling the
-
Implement your logic according to your needs. Refer to the vss::lighting_system_control::LightingSystemControl service.
Implementation of Subscription to Sensor Data Notifications
Prerequisites
- The preliminary steps are done: sensor_data_output_notification.proto is compiled and included to your project.
- The gRPC channel is already created.
Steps
-
Instantiate the
SensorDataNotifier.SensorDataNotifierClientclass from the gRPC channel. The classSensorDataNotifierClientis generated from the protobuf contract which defines the serviceSensorDataNotifier.var client = new SensorDataNotifier.SensorDataNotifierClient(_channel); -
Start AVX and subscribe to notifications. You can subscribe to notifications as soon as AVX is ready to receive RPC requests.
using (var call = client.Subscribe(new Empty())){while (await call.ResponseStream.MoveNext(CancellationToken.None)){SensorDataDescription notification = call.ResponseStream.Current;// Go on with your business logic e.g. filter notifications, request data, ...}}Note: As notifications might come in fast, you should consider treating them as fast as possible. For example analyzing notifications and requesting data outside of the while loop, inside another thread might be a good idea.
Implementation of Sensor Data Acquisition
You can access the sensor data in two different ways depending on your use case.
Accessing the sensor data directly from the shared memory
Note: To access the sensor data directly from the shared memory, the sensor and the component requesting the data must be located on the same machine.
Prerequisites
- Compile all the needed protobuf contracts. Please follow the instructions on the Protocol Buffers and gRPC websites. There are several tutorials and documentation available.
-
Generate the plugin. To do so, three executables are provided in the
VSS_API > binfolder.Assuming you start from a given protobuf contract, you can generate extra tooling leveraging built-in
protocplugin mechanism.> protoc.exe --shm_out=<shmOutputFolder> \--plugin=protoc-gen-shm=<shm_xx_plugin.exe> \--proto_path=<myProtoFolder> <MyProtoFile>Where <shm_xx_plugin.exe> is the path to
shm_cpp_plugin.exe,shm_csharp_plugin.exeorshm_python_plugin.exe.You end up with an
xxx.shm.h|xxx.shm.cs|xxx.shm.pyfile.You can of course enrich an existing
protoccommand line (generating gRPC files) with--shm_outand-plugin=protoc-gen-shmoptions. Then you will end up with an extraxxx.shm.h|cs|pyfile, along with well-known generated ones iexxx.pb,xxx.grpc.pb&xxx.grpc.pb.Note: The function signature in generated
.shmfiles shall be compatible with gRPC function signature. Thus, when you generate both.shmand gRPC files, it is recommended to use the same gRPC version that the Shm plugin version. You can find this version in the header of the generated.shmfiles. - Include the generated code into your project.
Steps
-
Start AVX and subscribe to notifications.
-
Once a notification about new sensor data is received, the data can be acquired in one of two ways:
- doing a call with a client instance that has the same signature as the call from data access server.
- doing a static call with the sensor data identifier you want to request from the shared memory.
Both methods use the same underlying code and are differentiated only in their function signature.
- Instance call:
// Create clientvar channel = new Channel("localhost:50051", ChannelCredentials.Insecure);var client = new DataAccess.DataAccessClient(channel);// Request DataTask<SensorDataBuffer> res = await client.RequestDataOptimized(sensorDataIdentifier);SensorDataBuffer sensorDataBuffer = res.Result;- Static call:
// Request DataSensorDataBuffer sensorDataBuffer = DataAccess.DataAccessClient.RequestDataQuery(sensorDataIdentifier); -
You can parse the received data buffer using the class
SensorDatagenerated from the sensor_data.proto file:if (sensorDataBuffer.Data.IsEmpty){// An empty buffer is returned if data couldn't be retrieved (e.g. when data is already released)}else{// Deserialize data bufferSensorData data = SensorData.Parser.ParseFrom(sensorDataBuffer.Data);}
Accessing the sensor data using the RPC
Prerequisites
- The preliminary steps are done: sensor_data_access.proto, sensor_data_buffer.proto and sensor_data.proto are compiled and included to your project.
- AVX is started with the following process argument:
- -p followed by the port of the AVX internal gRPC server
- when the client application will run on another machine, the -h | –host followed by the IP address of the machine on which AVX internal gRCP server is running.
- -d
Steps
-
Create a gRPC channel to communicate with the Data access server. The client can only receive 4 MB by default, so you need to setup the channel and set the length for any received message to unlimited (-1 for unlimited).
// Specifying the host address and port number of the data access servervar endpoint = "localhost:50508"// Instanciating the gRPC channelvar channel = new Channel(endpoint,ChannelCredentials.Insecure,new List<ChannelOption>{new ChannelOption(ChannelOptions.MaxReceiveMessageLength, -1)}); -
Instantiate the
DataAccessClientclass from the gRPC channel. The classDataAccessClientis generated from the Protobuf contract which defines the serviceDataAccess.// Create clientvar client = new DataAccess.DataAccessClient(channel); -
Start AVX with the sensor data access server (argument
-d|--dataAccessServer <PORT>) and subscribe to notifications as described above. -
Once a notification about new sensor data is received, you have two choices:
Request Data through a single proto message
-
The data can be acquired through a single message by calling the DataAccessClient.RequestData method and using the unique data identifier acquired from the notification.
// Request DataTask<SensorDataBuffer> sensorDataTask = client.RequestDataAsync(sensorDataIdentifier).ResponseAsync;SensorDataBuffer sensorDataBuffer = sensorDataTask.Result; -
You can parse the received data buffer using the class
SensorDatagenerated from the sensor_data.proto file:if (sensorDataBuffer.Data.IsEmpty){// An empty buffer is returned if data couldn't be retrieved (e.g. when data is already released)}else{// Deserialize data bufferSensorData data = SensorData.Parser.ParseFrom(sensorDataBuffer.Data);}
Request Data through a stream
-
In stream mode, data is split and sent to clients in chunks. These data chunks can be acquired through a stream by calling the DataAccessClient.RequestDataStream method and using the unique data identifier obtained from the notification.
// Request Datausing var streamingCall = _client.RequestDataStream(sensorDataIdentifier); -
You can concatenate the data chunks received through the stream into a byte array:
using var memoryStream = new MemoryStream();while (await streamingCall.ResponseStream.MoveNext(CancellationToken.None)){memoryStream.Write(streamingCall.ResponseStream.Current.Data.ToByteArray());}return memoryStream.ToArray(); -
By default, the size of a stream data chunk is 256 kB. You can modify the size of data chunk by editing the VRXPERIENCE_Sensors_dataAccessServer.dll.config file (delivered with AVX installation, located in the executable folder). To do so, change the value for the sensorDataChunkSize key (must be a positive integer).
<appSettings><add key="isDiagnosticOn"value="false"/><add key="sensorDataChunkSize"value="262144"/></appSettings>
Implementation of Ground Truth Data Helper
Prerequisite: The preliminary steps are done: The gRPC channel is already created and the ground_truth_data_helper.proto is compiled and included in your project.
-
Instantiate the
GroundTruthDataHelper.GroundTruthDataHelperClientclass from the gRPC channel. The classGroundTruthDataHelperClientis generated from the protobuf contract which defines the serviceGroundTruthDataHelper._client = new GroundTruthDataHelper.GroundTruthDataHelperClient(_channel); -
Wait for the simulation to be in Loaded or Running state (see AVX State Machine above).
At any time in Loaded or Running state you can send a:
-
GetContributionDictionary request to retrieve the current contribution dictionary of a lidar by calling the
GroundTruthDataHelper.GroundTruthDataHelperClient.GetContributionDictionary(SensorIdentifier)method with the wanted sensor identifier. -
GetPixelSegmentationTagColorMap request to retrieve the tag/color map used in the camera pixel segmentation algorithm by calling the
GroundTruthDataHelper.GroundTruthDataHelperClient.GetPixelSegmentationTagColorMap (new Empty()).
-
GetContributionDictionary request to retrieve the current contribution dictionary of a lidar by calling the
- Implement your logic according to your needs. Refer to the vss::ground_truth_access::GroundTruthDataHelper service.
