Documentation
Last update: 16.07.2025Introduction
Intended for developers who need to streamline the preparation of AVX assets and tracks, AVxcelerate Asset Preparation API exposes the interfaces required to prepare AVX assets and tracks.
It allows you to:
- create geometries,
- apply physical properties
- organize geometries into a scene tree in order to:
- generate an AVX asset,
- add the scene tree to an environment to generate an AVX track.
The AVX assets and tracks created using the API can be:
- exported as files written on the disk (*.asset or *.track), which can be used in a sensors simulation, and also opened in AVxcelerate Asset Preparation Editor
streamed to the Sensors Simulator API server, see Data Streaming with Chunk.
A Python sample illustrating how to use this exchange format is provided in
Optical Products/VRXPERIENCE/APIs/Asset_Preparation_API/Samples/Python(asset_prep_to_avx_sensors_streaming.py).
Using AVxcelerate Asset Preparation API, you can develop:
- an add-on for a terrain creation tool to export AVX tracks
- an add-on for a 3D computer graphics software to export AVX assets
- a custom exporter to convert data from any standard format (obj or fbx for instance) to the AVX format
- a script to automate the physics-based preparation process of AVX tracks and assets
- a "live terrain creation" capability in your custom co-simulation module (add-on for your driving simulator) created with AVxcelerate Sensors Simulator API
Current Version Limitations
With this version of the API, States not being available, in order to prepare a static or dynamic asset with different states, you will have to export the asset as a file from the API, then open it in AVxcelerate Asset Preparation Editor in a second step to apply states, then export the asset from the Editor.
Creating animated pedestrians or animated animals is not possible.
This API is meant to be a one-shot AVX Assets and Tracks creation tool. Once exported from the AVxcelerate Asset Preparation API, AVX Assets and Tracks cannot be imported to the API.
Definition of Terms
Here are the definitions of some important terms used throughout the AVxcelerate Asset Preparation API.
- An AVX track is the world environment in which the sensors simulation will take place. It must be based on the road/track/terrain (the terminology depends on the driving simulator) including the road logic, terrain topography, road and landscape decoration.
- An Asset is an element to be included in an AVX sensors simulation, such as a vehicle, a street light or a traffic sign.
- content: geometries (3D representation + properties) organized into a scene tree
- format: packaged in the format as expected by AVxcelerate Sensors Simulator
- An Entity is any object created through the API that can be packaged within an AVX format and exported, as chunks or as a file, from the API or imported as chunks. Among all the objects that can be created using the API, only the following are entities:
- Scene Tree (asset)
- Environment (track)
- Resource In the context of the AVxcelerate Asset Preparation API, a Resource is an external file that can be uploaded, then referenced as a property of an object. For more details about the accepted type of resources, see Resource Preparation Service.
- An Object is any component created through the API and accessible via its identifier.
A unique Identifier is automatically assigned to any object as soon as it has been created. This ID is the key for accessing the binary data representing the object kept in memory. Note The "in-memory" data is non-persistent, objects are kept in the "collection" only as long as the server is running.
The identifier of an object is needed for various purposes, for example:
- when creating an object under a scene tree: to define its parent
- to reference an object in another service (e.g. referencing a scene tree in an environment, referencing a geometry as a geometry instance under the node of a scene tree, referencing a surface source in the material part properties of a geometry)
- for entities: to export an entity as chunks or as a file (e.g. exporting a scene tree as an asset)
- to edit the properties of an object
gRPC Services
AVxcelerate Asset Preparation API is composed of different protocol buffer contracts and gRPC services.
The main benefit of using gRPC with protocol buffers is that the contract files (.proto) can be compiled into different programming languages.
In this document, some code snippets written in C# programming language are provided. Python samples demonstrating the usage of the Asset Preparation API are provided in the Asset_Preparation_API folder.
This API includes the following gRPC services:
- Information Service
- Reset Service
- Resource Preparation Service
- Geometry Preparation Service
- Scene Tree Preparation Service
- Environment Preparation Service
- Sky Preparation Service
- Material Preparation Service
- Surface Source Preparation Service
- Directional Light Preparation Service
- Point Light Preparation Service
All those services rely on the Asset Preparation server.
Asset Preparation Server
To access the AVxcelerate Asset Preparation API, the server must be started so that the services are active.
The script to start the server is provided in the Asset_Prep_API folder:
- on Windows: asset_preparation.ps1 (with the default installation path the script is located in
C:\Program Files\ANSYS Inc\v232\Optical Products\VRXPERIENCE\APIs\Asset_Prep_API) - on Linux: asset_preparation.sh (with the default installation path the script is located in
/ansys_inc/v232/OpticalProducts/VRXPERIENCE/APIs/Asset_Prep_API)
To access to the user documentation of the API, launch the script with the user-doc argument.
Port
The default port the server uses to communicate is TCP port 5001.
If this port is already used by another application, open the .ps1 or .sh script in a text editor and edit the value of the PortNumber (Windows) or assets_port (Linux) variable.
Starting the Asset Preparation Server
To start the Asset preparation server, launch the script with the start argument.
Example on Windows using PowerShell
Example on Linux using PowerShell
Stopping the Asset Preparation Server
To stop the Asset preparation server, launch the script with the stop argument.
Example on Windows using PowerShell
Example on Linux using PowerShell
Status and Error Management
All rpc calls return a response containing a Status. The goal of this message is to inform about the level of success of the operations. It contains 3 pieces of information:
- The Level of success:
- fully successful,
- successful with warnings,
- unsuccessful with errors.
- The error code following gRPC standards, most common codes are:
- 0 for success and warning,
- 3 if some input parameters are invalid,
- 5 if an identifier is not found on the server,
- 11 if some input parameters are out of range.
- The message that describes the operation's status.
Streaming Data with Chunk
The Chunk message is used for streaming binary data:
- to export assets or tracks as chunks (from the Environment Preparation service or Scene Tree Preparation service)
- to upload and download resources (Resource Preparation service)
All stream requests or responses in AVX Asset Preparation API use with the following description:
A chunk can include either:
- only metadata,
- only data,
- both metadata and data.
The service receiving the data handles the chunks in the same order as it receives them, and ignores void data. If more than one chunk contains metadata, the maps will be merged in the order they are received, overwriting items with the same keys. Therefore, the service sending the data must send the chunks sequentially.
For information about using streams as input in AVxcelerate Sensors Simulator, refer to the Upload service in the AVX Sensors Simulator API documentation or to the Python sample asset_prep_to_avx_sensors_streaming.py.
Performance advice
- Each chunk should not exceed 1MB.
- If there are several chunks to send:
- each chunk should be equal or superior to 256kB,
- all the needed metadata should be sent in the first chunk and only the byte array in the other ones.
Services
The diagrams in the below Data Structure sections aim at illustrating the structure of each object that a service allows you to create. They do not represent the workflow to follow to create AVX entities.
Diagrams reading convention
 Underlined texts represent references to an object or entity created from another service and which is accessible via its identifier. Examples: a scene tree is referenced in an environment, a geometry is referenced in a geometry instance.
 Boxes with large borders represent elements that can be repeated. Examples: a scene tree can have one or several child nodes, a geometry can include one or several material parts, a vertices array can include one vertex or several vertices.
 Dashed boxes represent objects or properties that are optional or only required in specific conditions. Examples: the node under a tree may have a child node.
 Rounded boxes represent possibilities (OneOf). Example: the rotation can be a Quaternion or Euler Angles.
Note To ease the creation of objects using this API, most of the fields in the creation request messages are not required: if a field is not specified, the default value for the field is used. Refer to the message documentation page in the Class section to know the default value of each field. The fields where a reference or an instance is expected however are always required.
Information Service
The Information service (exposed in the information/information.proto file) allows you to check if the server and all the services are running properly.
Example: System health check
Reset Service
The Reset service (exposed in the common/reset.proto file) allows you to reset the Asset Preparation Server, that is to say to clear all the data from the server. Resetting the server removes from the server all the "in-memory" data, namely all the data imported or created, collections and identifiers.
Example: Server reset
Resource Preparation Service
The Resource Preparation service (exposed in the resource/resource.proto file) allows you to upload and download resources, such as textures and spectra to use them in your scene construction.
Input
The Resource Preparation service accepts a stream of chunks as input of the UploadResource call (see asset_preparation::v1::resource::ResourcePreparation). The service waits for metadata with the AVX MIMEType key, which contains the MIMEType of the sent data.
Here are the accepted MIME Types:
- for texture
image/ddsimage/tgaimage/bmpimage/hdrimage/exrimage/pngimage/jpgimage/jpegimage/gif
- for dielectric material
dielectric/dielec
- for intensity diagram
intensity-diagram/ies
- for spectrum
spectrum/spectrum
- for surface state
surface-state/brdfsurface-state/anisotropicbsdfsurface-state/scatteringsurface-state/simplescatteringsurface-state/mirrorsurface-state/unpolishedsurface-state/retroreflectingsurface-state/doesurface-state/fluorescentsurface-state/gratingsurface-state/polarizersurface-state/bsdf180surface-state/bsdfsurface-state/coated
- for volume material
volume-material/material
- for irradiance map
irradiance-map/xmpThe irradiance map must comply with the following requirements:
- unit type must be radiometric or spectral,
- spectral definition must be in the Long-wavelength infrared range of the electromagnetic spectrum going from 7 to 14 micrometers,
- merging all the layers into one is highly recommended.
Note: You can generate an irradiance map (*.xmp) file with Speos:
- Create an irradiance sensor. For more details, refer to Creating an Irradiance Sensor in Ansys Speos User's Guide.
-
The orientation of the xmp must be:
- +X of the xmp map: the right lateral direction of the car (+x expressed in car coordinate system)
- -Y of the xmp map: forward direction of the car (-z expressed in car coordinate system)
- Run a simulation.
A user-defined name can be provided to the uploaded resource with the AVX DataName key, which contains the name of the sent data.
Example: send the first chunk containing only metadata
Output
The Resource Description service outputs chunks as a byte stream from the DownloadResourceAsChunks call (see asset_preparation::v1::resource::ResourcePreparation). The service sends metadata with the AVX MIMEType key defining the type of the data, with the same format as for the UploadResource: type/subtype with the original file extension as a subtype, and the AVX DataName key defining the name of the data. The data is the stream of the original file. The ID of a downloaded resource can then be used to reference the resource in a message of another service.
Note: Irradiance maps cannot be downloaded, neither as chunks, nor as file because after import, the xmp file is converted into a proprietary format which cannot be converted back to the xmp file format.
Geometry Preparation Service
The Geometry Preparation service (exposed in the geometry/geometry.proto file) allows you to build geometries from vertices.
Data Structure
Here is the structure of a geometry:
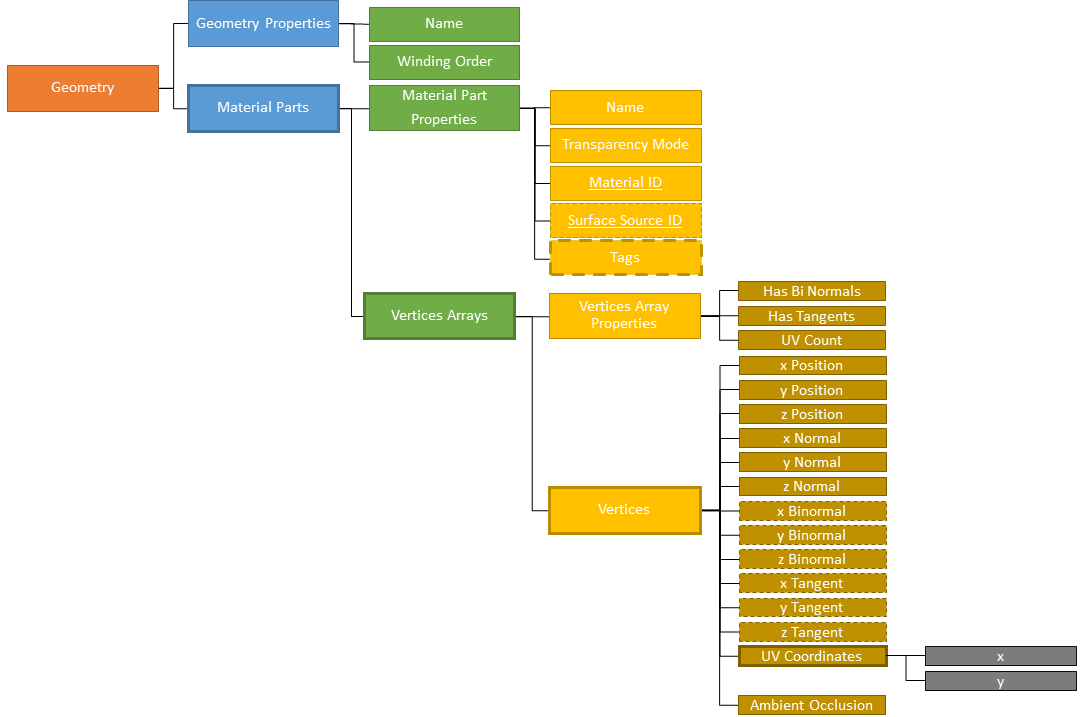
A geometry can have one or several material parts.
Each material part can include one or several vertices arrays.
Each vertices array can have one vertex or several vertices.
The x, y and z bi-normals are needed only if the has_bi_normals setting in the vertex format is set to true.
The x, y and z tangents are needed only if the has_tangents setting in the vertex format is set to true.
When the UV count is set to a value superior to one in the vertex format, the UV coordinates must be repeated as many times as the value set for the UV count.
A material created using the Material Preparation service must be referenced, using its ID, in a material part. When no material is defined in a geometry, the default material is automatically added.
A surface source created using the Surface Source Preparation service may be referenced, using its ID, in a material part.
In the Material Part Properties, you can add or remove one or several tags using added_tags or removed_tags.
Inputs
The inputs of the Geometry Preparation service are:
- a 3D component in any basic exchange format (for instance fbx, obj), proprietary format or any data as long as the geometries description at the vertices and polygons levels can be retrieved (for instance from an API),
- the ID of material (referenced to using its identifier) that has been created with the Material Preparation service,
- optionally, the ID of a surface source created using the Surface Source Preparation service.
Outputs
The output of the Geometry Preparation service is the binary data of the geometry with an identifier. This identifier is to be used in the Scene Tree Preparation service to reference the created geometry as a geometry instance in a scene tree.
Geometries are not meant to be exported as files or as chunks. For each geometry that is referenced in a scene tree which is exported as a .asset file from the Scene Tree service (GetAssetFile call), or referenced in a scene tree that is referenced in an environment exported as a .track file from the Environment service (GetTrackFile), a .mesh file (with its associated .geometry file) is created. In other words, a geometry created through the API corresponds to a mesh in AVxcelerate Asset Preparation Editor.
Scene Tree Preparation Service
The Scene Tree Preparation service (exposed in the scenetree/scenetree.proto file) allows you to build scene trees from geometries.
Data Structure
Here is the structure of a scene tree:

You can add or remove one or several tags using added_tags or removed_tags in:
Node PropertiesGeometry Instance PropertiesPoint Light Instance Properties
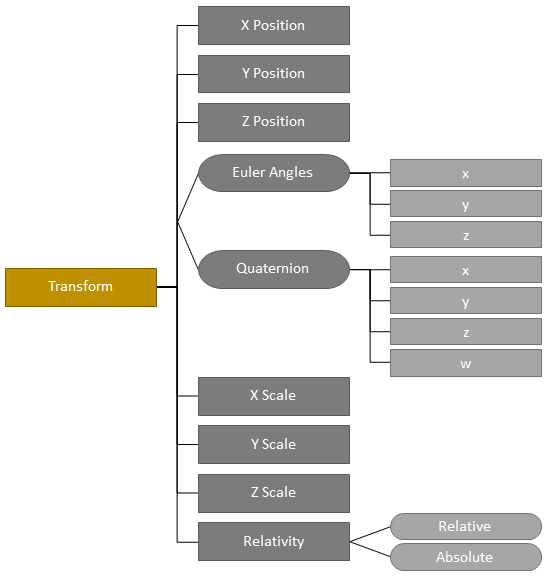
Here is the structure of a transform:
Tags
The Tag message, exposed in the common/tag.proto file, allows you to specify parts of interest so that the assets are properly animated during the simulation. Refer to the page asset_preparation::v1::common for the expected case of each tag.
There are two main categories of tags: Basic and Lighting System.
Here are the Tags of the Basic category:
- Pedestrian
- Vehicle
- Animal
- Street Light
- Road Sign
- Simulation Object (corresponds to the Object tag in AVxcelerate Asset Preparation Editor)
- Custom Object (corresponds to the Custom tag in AVxcelerate Asset Preparation Editor)
- Vehicle Body
- Sensor Referential
- Lighting System Referential
- Wheel
- Steering Wheel
Basic tags can be added to Nodes and Geometry Instances.
Here are the Tags of the Lighting System category:
- Brake Light
- Low Beam
- High Beam
- Turn Indicator
- Rear Fog Light
- Front Fog Light
- Side Light
- Rear Position Light
- Reverse Light
- License Plate Light
- Daytime Running Light
Lighting System tags can be added to Nodes, Geometry Instances, Point Lights Instances and Material parts.
A property is required for the following tags:
- the Custom Object tag requires a
Nameset in itsProperties - the Wheel tag requires an
IDset in itsProperties - the Daytime Running Light and Turn Indicator tags require a
Positionset in the tag'sProperties
The following tags can hold an optional Label set in its Properties: Pedestrian, Vehicle, Animal, Street Light, Road Sign, Simulation Object and Custom Object. The Vehicle tag can hold an optional Irradiance Map ID set in its Properties, which is the ID of an irradiance map created using the Resource Preparation service.
Inputs
The inputs of the Scene Tree Preparation service are:
- the geometries (referenced to using identifiers) that have been created with the Geometry Preparation service,
- the directional lights (referenced to using identifiers) that have been created with the Directional Light Preparation service,
- the point lights (referenced to using identifiers) that have been created with the Point Light Preparation service.
Outputs
Here are possible outputs of the Scene Tree Preparation service.
- The binary data of the scene tree with an identifier. This identifier can be used to reference the created scene tree in an environment.
- Chunks of binary data from the
GetAssetChunkscall, see asset_preparation::v1::scene_tree::SceneTreePreparation. The data is the content of the asset. - A .asset file from the
GetAssetFilecall, see asset_preparation::v1::scene_tree::SceneTreePreparation. When the .asset file exported from the API is imported in AVxcelerate Asset preparation Editor, the scene tree is converted to one .scenetree file.
Environment Preparation Service
The Environment Preparation service (exposed in the environment/environment.proto file) allows you to build environments from scene trees.
Data Structure
Here is the structure of an environment:
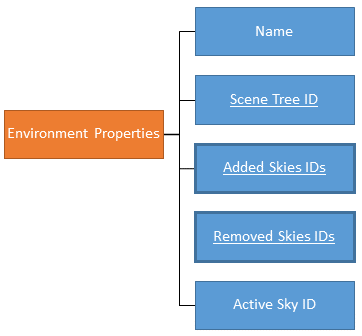
An environment references a scene tree created from the Scene Tree Preparation service via its identifier. It also includes one or several skies, created from the Sky Preparation service, which are referenced via their identifiers. One of these skies must be set as the active sky.
Inputs
The inputs of the Environment Preparation service are:
- the scene tree (referenced to using its identifier) that has been created with the Scene Tree Preparation service,
- a list of skies (referenced to using their identifiers) that have been created with the Sky Preparation service,
- the ID of one sky added to the environment to be set as the active sky. If there is no sky added to the environment when exporting it into a track, a default natural sky, whose ID is 0, is automatically created, added to the track and set as the active sky.
Outputs
The different outputs of the Environment Preparation service are:
- chunks as a byte stream from the
GetTackChunkscall (see asset_preparation::v1::environment::EnvironmentPreparation). The data is the content of the track. - a .track file from the
GetTrackFilecall (see asset_preparation::v1::environment::EnvironmentPreparation). When the .track file exported from the API is imported in AVxcelerate Asset preparation Editor, the environment is converted to one .env file.
Sky Preparation Service
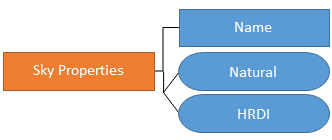
The Sky Preparation service (exposed in the sky/sky.proto file) allows you to create, edit and manage HDRI and natural skies.
Data Structure
Here is the structure of a sky:
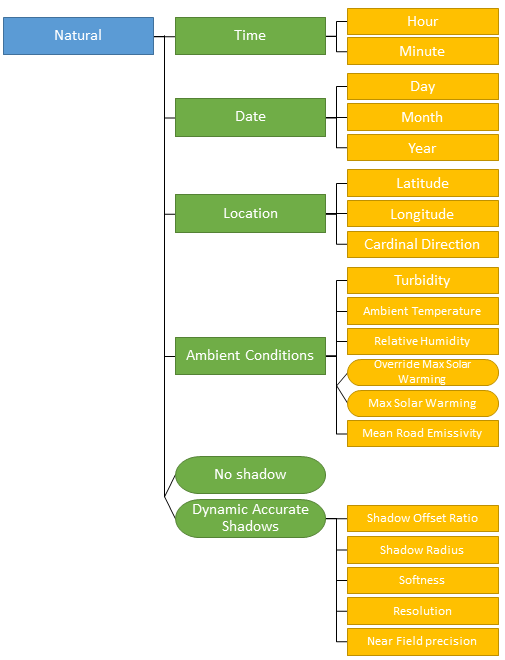
Here is the structure of a natural sky:
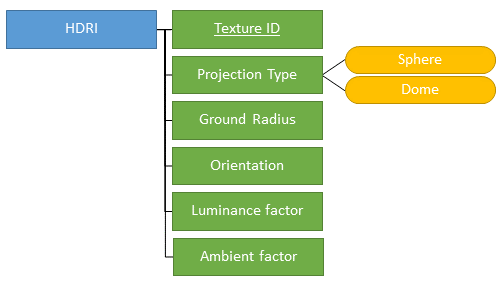
Here is the structure of an HDRI sky:
Input
For HDRI skies, the ID of a texture created using the Resource Preparation service is required as an input.
Output
The output of the Sky Preparation service is the binary data of the sky with an identifier. This identifier is to be used in the Environment Preparation service to reference the created sky in an environment.
Skies are not meant to be exported as files or as chunks.
Material Preparation Service
The Material Preparation service (exposed in the material/material.proto file) allows you to create, edit and manage materials.
Note: The sample geometry_generation_gltf.py does not create materials, it uses physics-based materials provided in a library and on a mapping file.
Data Structure
Here is the structure of a material:
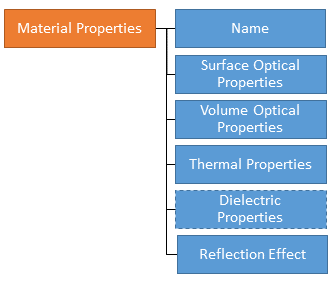
The data structure of each of the following sub-sets of material properties is detailed in the below sections:
- Surface Optical Properties
- Volume Optical Properties
- Thermal Properties
- Dielectric Properties, which are optional
- Reflection Effect Properties
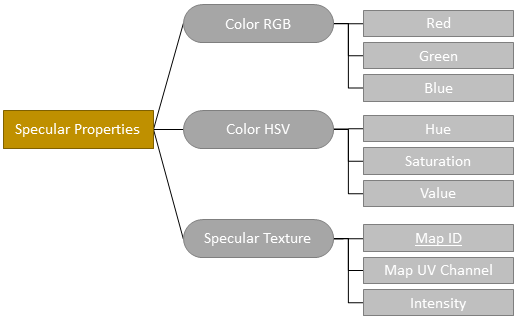
Surface Optical Properties

Then, the sub-sets of properties to define depend on the layer type.
Lambertian Layer

Mirror Layer

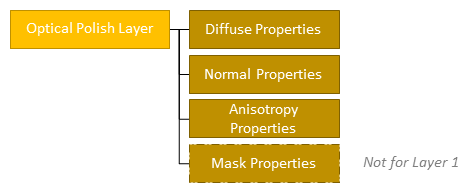
Optical Polish Layer
LibraryLayer

Rendering Layer
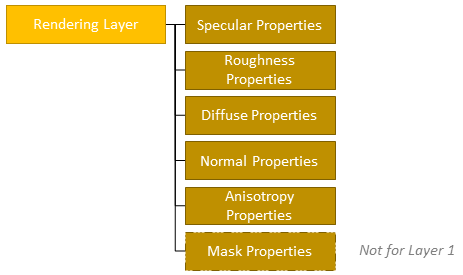
Layers Properties


Volume Optical Properties
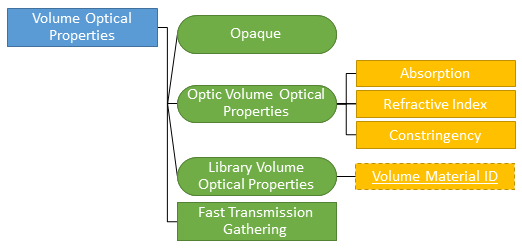
There are 3 possible types of Volume Optical Properties: Opaque, Optic and Library. When the Volume Optical Properties type is set to Library, the ID of a volume material created using the Resource Preparation service must be referenced.
Thermal Properties
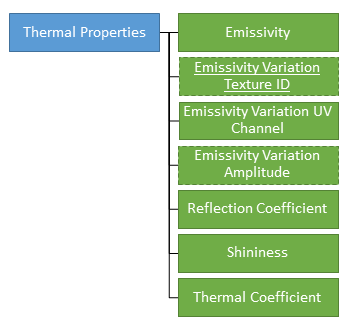
The Emissivity Variation Texture ID is optional. When set, the ID of texture created using the Resource Preparation service must be referenced. The Emissivity Variation Amplitude is required only when an Emissivity Variation Texture ID has been set.
Dielectric Properties

The Dielectric Properties are optional. If you want to define the dielectric properties of the material, the ID of a dielectric material created using the Resource Preparation service must be referenced.
Reflection Effect Properties
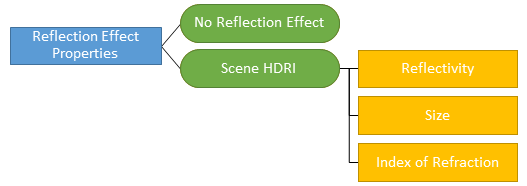
There are 2 possible types of reflection effect: No Reflection Effect and Scene HDRI. When the Reflection Effect Type is set to Scene HDRI, the Reflectivity, Size and Index of Refraction parameters must be set.
Inputs
The ID of a resource created using the Resource Preparation service is needed as an input in some cases.
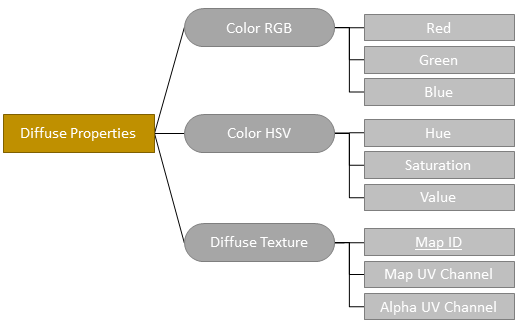
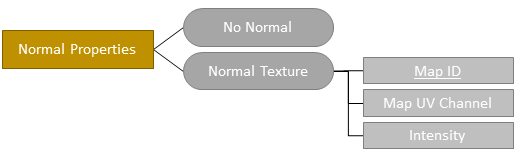
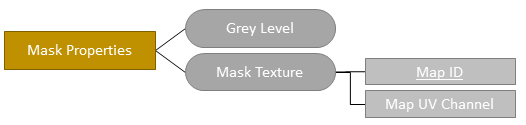
- For the Diffuse, Normal, Mask, Anisotropy, Specular and/or Roughness Properties with the
texture. - For
Library Volume Optical Properties, the ID of a volume material is required. - If you want to define dielectric properties, the ID of a dielectric material is required.
- In the Thermal Properties, if you want to set an Emissivity Variation from a texture, the ID of a texture is required.
Output
The output of the Material Preparation service is the binary data of the material with an identifier. This identifier can be used in the Geometry Preparation service to reference the created material under a material part.
Materials are not meant to be exported as files or as chunks.
Surface Source Preparation Service
The Surface Source Preparation service (exposed in the surfaceSource/surfacesource.proto file) allows you to create, edit and manage surface sources and display sources.
Data Structure
Here is the structure of a source:
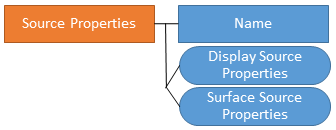
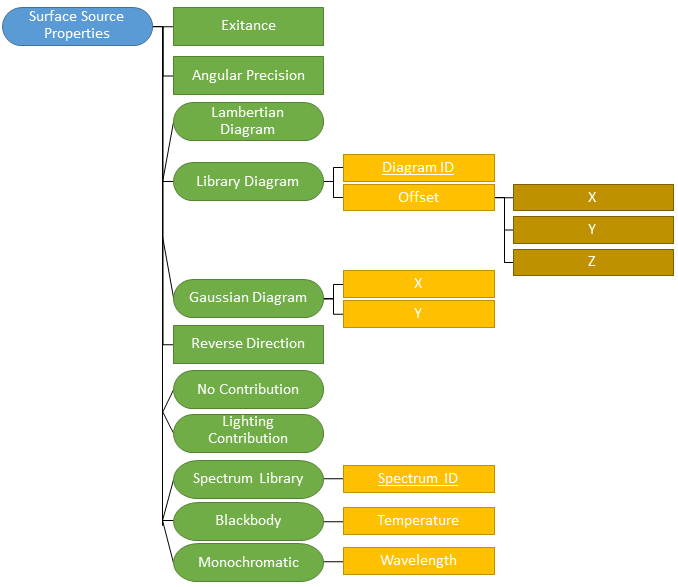
Here is the structure of a surface source:
Here is the structure of a display source:
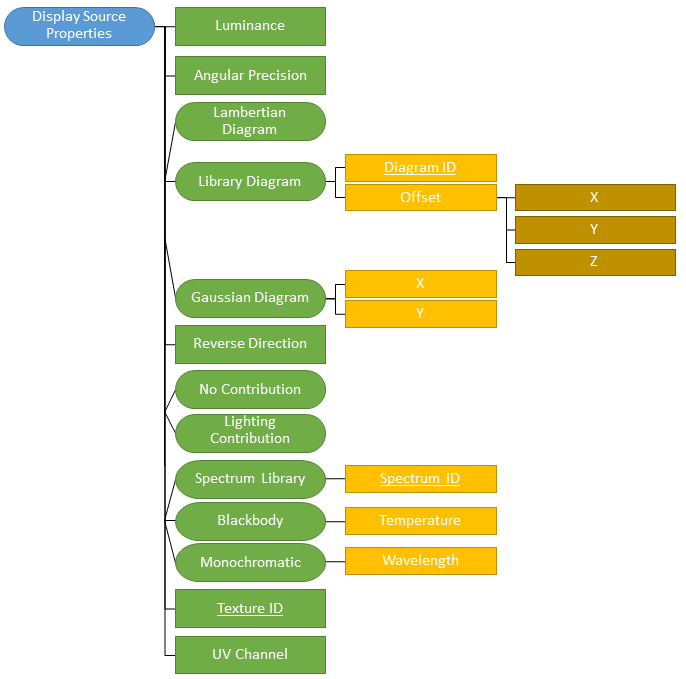
There are three possible types of angular diagram. When the angular diagram type is set to Library, the ID of an intensity diagram created using the Resource Preparation service must be referenced.
In the properties of a surface source or display source, you can define whether it contributes to the ambient lighting (Lighting Contribution) or not (No Contribution).
There are three possible types of spectrum. When the texture type is set to Library, the ID of a spectrum created using the Resource Preparation service must be referenced.
For display sources, the ID of a texture created using the Resource Preparation service must be referenced.
Here are the properties for the lighting contribution:

Inputs
The ID of a resource created using the Resource Preparation service is required as an input:
- for
Library Diagram(ID of an intensity diagram), - for
Spectrum Library(ID of a spectrum), - for display sources (ID of a texture).
Output
The output of the Surface Source Preparation service is the binary data of the surface source with an identifier. This identifier can be used in the Geometry Preparation service to reference the created surface source under a material part.
Surface sources are not meant to be exported as files or as chunks.
Directional Light Preparation Service
The Directional Light Preparation service (exposed in the directionalLight/directionallight.proto file) allows you to create, edit and manage directional lights.
Data Structure
Here is the structure of a directional light:
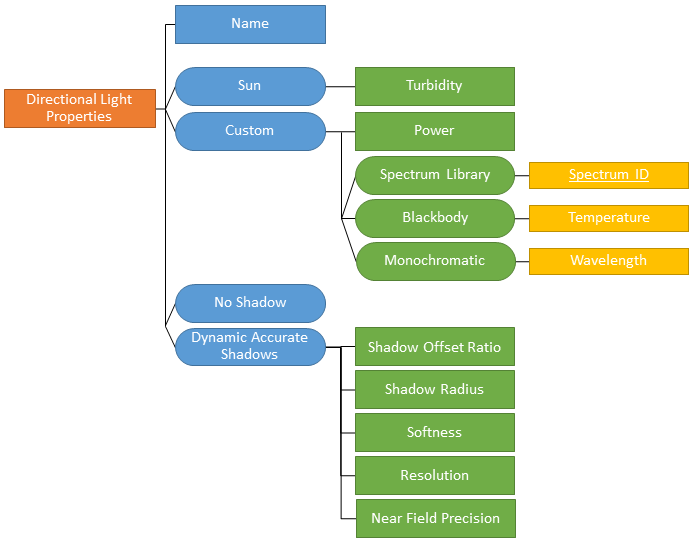
There are two possible types of directional light: Sun or Custom.
In the properties of a directional light, you can define whether it casts shadows (Dynamic Accurate Shadows) or not (No Shadows).
Inputs
For Custom type with a Spectrum Library, the ID of a spectrum created using the Resource Preparation service is required as an input.
Output
The output of the Directional Light Preparation service is the binary data of the directional light with an identifier. This identifier can be used in the Scene Tree Preparation service to reference the created directional light as a directional light instance under a node.
Directional Lights are not meant to be exported as files or as chunks.
Point Light Preparation Service
The Point Light Preparation service (exposed in the pointLight/pointlight.proto file) allows you to create, edit and manage point lights.
Data Structure
Here is the structure of a point light:
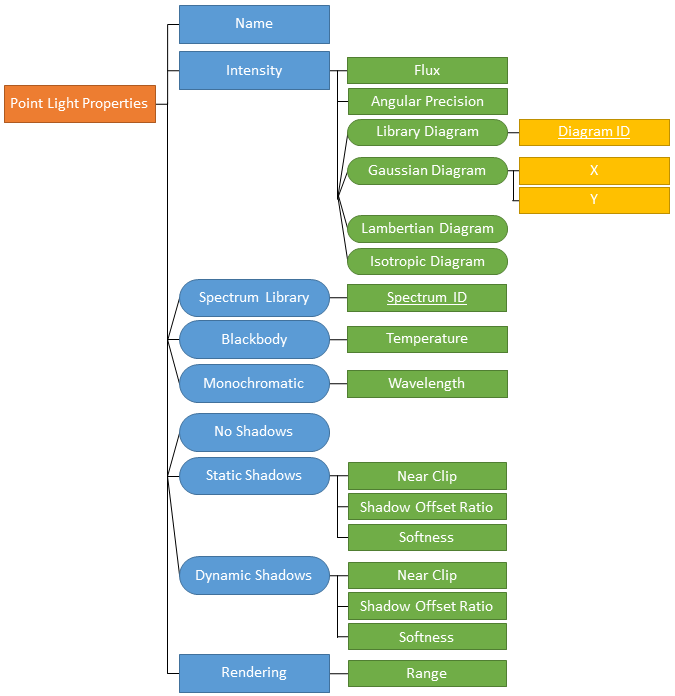
Inputs
When the Spectrum type is Spectrum Library, the ID of a spectrum created using the Resource Preparation service is required as an input. When the Intensity diagram type is Library Diagram, the ID of an intensity diagram created using the Resource Preparation service is required as an input.
Output
The output of the Point Light Preparation service is the binary data of the point light with an identifier. This identifier can be used in the Scene Tree Preparation service to reference the created point light as a point light instance under a node.
Point Lights are not meant to be exported as files or as chunks.
AVxcelerate Asset Preparation API Outputs
The outputs of the AVxcelerate Asset Preparation API, namely AVX assets and tracks, can now be set as inputs for AVxcelerate Sensors Simulator.
Asset and Track Streams
For tracks and assets exported as a byte stream from the AVxcelerate Asset Preparation API, you must use the AVxcelerate Sensors Simulator APIs to set them as inputs for a sensors simulation.
- Use a dedicated grpc streaming service to stream the chunks (byte array) from the AVxcelerate Asset Preparation API server to the AVxcelerate Sensors Simulator API server.
- Request the stream upload from the Resource Uploader service of AVxcelerate Sensors Simulator APIs.
-
Set the ID of the uploaded resource the LOAD command > Configuration message > SceneInfo field:
- AssetInfo > Assets > ResourceIdentifier > ID
- Track > ResourceIdentifier > ID
Refer to the AVXCELERATE Sensors Simulator API Documentation.
Asset and Track Files
To check the *.asset and *.track files created using this API, open the files in AVxcelerate Asset Preparation Editor, refer to AVxcelerate Asset Preparation User's Guide.
To set the *.asset and *.track files as inputs for AVxcelerate Sensors Simulator for a co-simulation with CarMaker:
- add the references to the *.asset and *. track files into the json co-simulation mapping file,
- set the mapping file in the connector parameters.
Refer to Mapping AVX to CarMaker Track and Assets and Setting the AVXConnector Parameters.
To set the *.asset and *.track files as inputs for AVxcelerate Sensors Simulator through a custom connector built upon AVxcelerate Sensors Simulator API, define them in the Simulation Control service > LOAD command > Configuration message > SceneInfo field. Refer to the AVXCELERATE Sensors Simulator API Documentation.
