Rohith Patchigolla's brain is just bursting with Script Tips! He's back again this week to show us how to use the new “Python Code” object in Mechanical to automate Result creation and export during design point study. Thanks Rohith!
What if you could easily export all your results in Mechanical as images using simple scripts when running several design variations from Workbench automatically?
From the latest release i.e. v2022R2, we can do that!
This is possible because of the new, highly powerful, “Python Code” object, which is native in Ansys Mechanical, using which one can use simple python scripts, to automate tasks (such as exporting images, results and many more…).
So, how do I do it?
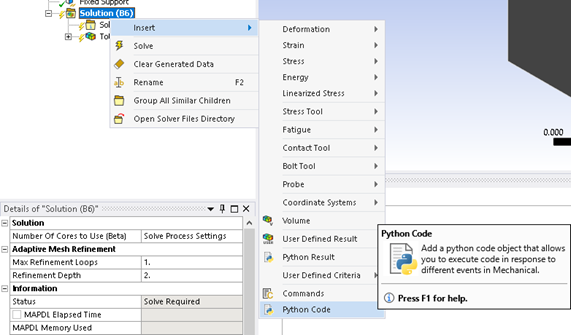
Step 1: Insert this “Python Code Object”
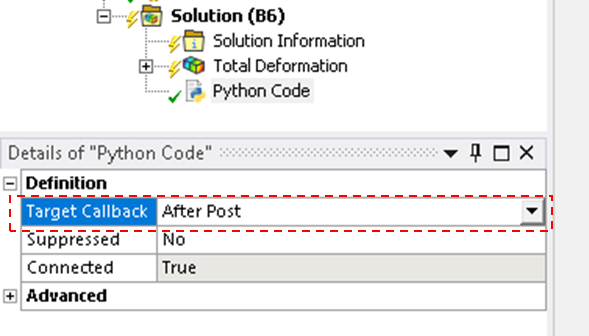
Step 2: Set a “Callback”, which is basically telling Mechanical, at which point you would like it to trigger the Python script
- In this case, we use “After Post”, as we want to wait till Mechanical solves the model so that the contour plots are available
Step 3: Put some code in it.
- The below code basically goes over each analysis in the Tree in Mechanical, searches for all the Equivalent Stress and Total Deformation result objects and exports the contour plots as images in the User Files Directory of the Project.
def after_post(this, solution):# Do not edit this line
    #import some required modules
    import os
    import wbjn


    #Get Design Point Number as Text (to append it to the image name)
    dpn=wbjn.ExecuteCommand(ExtAPI,"returnValue(a+Parameters.GetActiveDesignPoint().Name)",a="DP")

    #Get the User Files Directory of the Project to save images. Ofcourse you can use any path you like.
    UserFilesDir = wbjn.ExecuteCommand(ExtAPI,"returnValue(GetUserFilesDirectory())")


    #Some Graphics Settings
    gset = Ansys.Mechanical.Graphics.GraphicsImageExportSettings()
    gset.CurrentGraphicsDisplay = False
    gset.Width = 1920
    gset.Height = 1080


    for analysis in ExtAPI.DataModel.AnalysisList:
        #Get All Equivalent Stress Objects in all the Analyses in the Tree
        EqvStressResults = [child for child in analysis.Solution.Children if child.DataModelObjectCategory == DataModelObjectCategory.EquivalentStress]

        #Get All Total Deformation Objects in all the Analyses in the Tree
        TotalDeformationResults = [child for child in analysis.Solution.Children if child.DataModelObjectCategory == DataModelObjectCategory.TotalDeformation]
        AllResults = EqvStressResults + TotalDeformationResults
        for result in AllResults:
            result.Activate()
            fName=dpn+"_"+result.Name+"_" + analysis.Name+".png"
            fPath = os.path.join(UserFilesDir, fName)
            if os.path.exists(fPath):
                os.remove(fPath)
            Graphics.ExportImage(fPath, GraphicsImageExportFormat.PNG, gset)
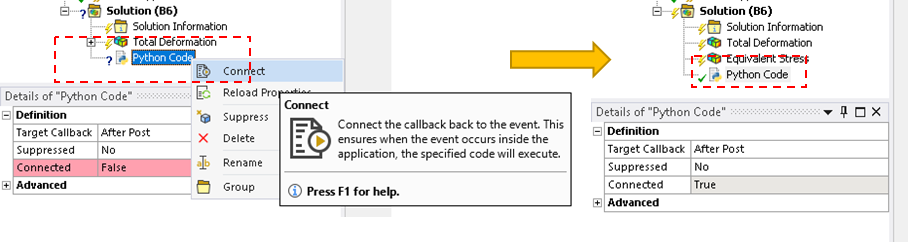
Step 4: Connect!
That’s it!
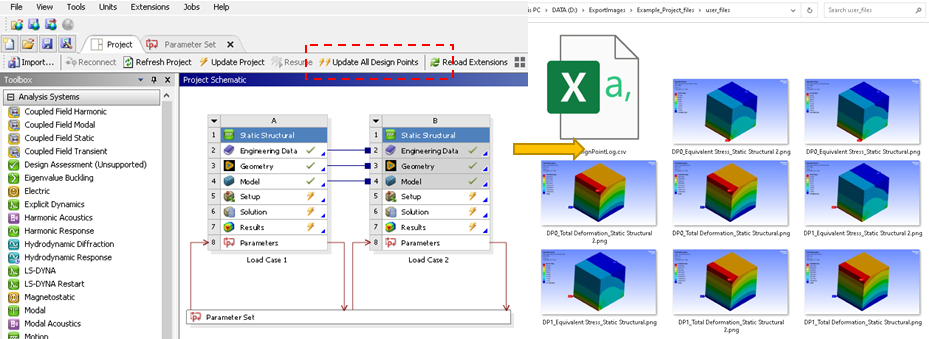
Now we can close Mechanical and run our Parametric analysis by solving directly from Workbench and let Mechanical save our plots automatically after solution is completed for each Design Point, in a desired directory.
Have fun!
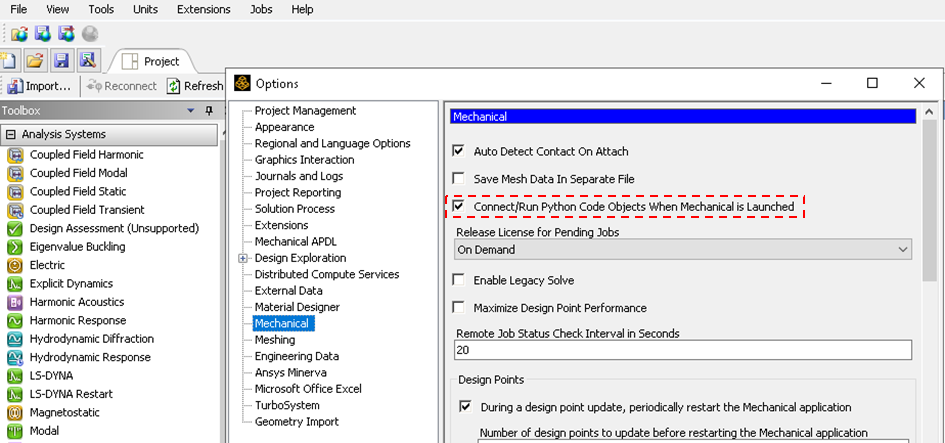
Just one important note:
Please activate the below option in Workbench before you start your Design Point study
- In Workbench -> Tools -> Options
- Options Window pops up. Go to Mechanical -> and check the box “Connect/Run Python Code Objects When Mechanical is Launched”