


Introduction
Ansys Mechanical is one of the most widely used FEA solvers in structural engineering, trusted for everything from component-level stress checks to full-system coupled analyses. The GUI is powerful and approachable, and for a focused analysis it is exactly the right tool.
Where scripting adds value is in the workflows that go beyond a single run: parametric studies with dozens of variants, results feeding into a CI/CD pipeline, overnight batch solves, or shared setups that a teammate can reproduce without a walkthrough. For those cases, PyMechanical extends what Mechanical already does well by giving you full programmatic control from Python. Import geometry, configure loads, run the solve, and pull results, all from a script or notebook. The same workflow runs locally on your laptop, on a remote server, or inside a Docker container without changing a line of code.
Requirements to follow along:
| Requirement | Details |
|---|---|
| Ansys Mechanical | 2024 R2 (v242) or later |
| Python | 3.10 – 3.14 |
| PyMechanical | pip install ansys-mechanical-core |
| Platform | Windows or Linux |
Jump straight to examples
- Basic examples covers core workflows including static structural, thermal, modal, harmonic, fracture, and topology-optimization analyses.
- Advanced examples has more complex, real-world simulations you can adapt directly for your own work.
- Remote examples covers how to run Mechanical in a remote session, ideal for CI/CD or Docker.
How it works
flowchart LR
    PY["Python Script / Notebook"]

    PY -->|"Embedding mode\n(App class)"| EMB["Mechanical runs\nINSIDE your Python process\n.NET CLR interop"]
    PY -->|"Remote session mode\n(launch_mechanical)"| REM["Mechanical runs as\na separate server\ngRPC over TCP/IP"]

    EMB --> SOLVER["Ansys Mechanical Solver"]
    REM --> SOLVER
| Embedding Mode | Remote Session Mode | |
|---|---|---|
| Process model | Mechanical inside Python | Mechanical as a server |
| Communication | Direct .NET object access | gRPC over TCP/IP |
| GUI support | No (batch only) | Yes (batch=False) |
| Best for | Jupyter, scripting, fast startup | CI/CD, Docker, HPC, automation |
| Key entry point | App |
launch_mechanical() |
The Example
PyMechanical provides two modes: embedding (Mechanical runs inside your Python process for fast, in-process scripting) and remote session (Mechanical runs as a separate gRPC server, ideal for CI/CD or Docker). Both modes share the same scripting API.
Starting an embedded session
from ansys.mechanical.core import App

app = App(globals=globals())
print(app)
# Ansys Mechanical [Enterprise]
# Product Version: 261
# Build date: 2024-06-12
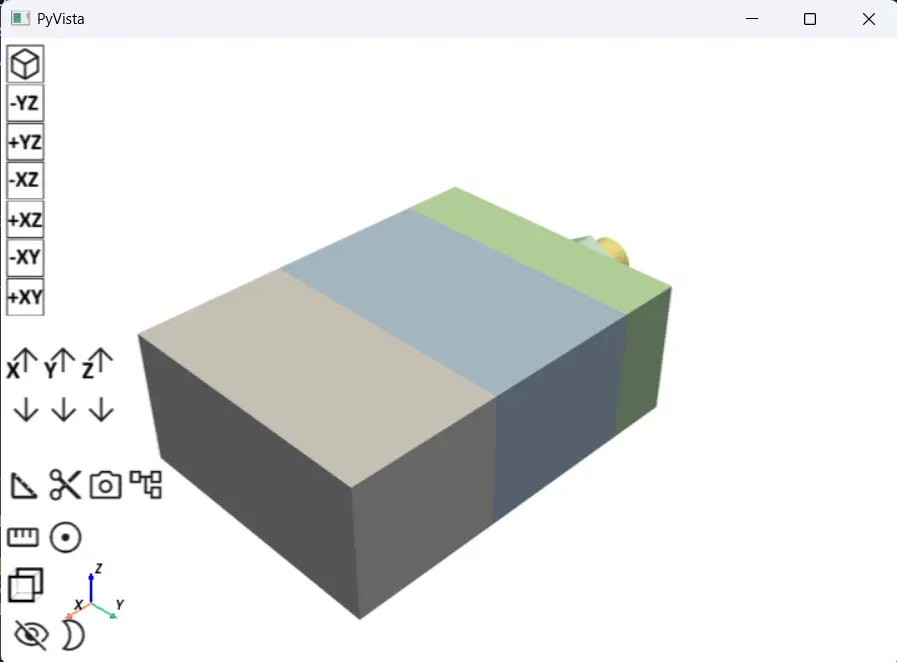
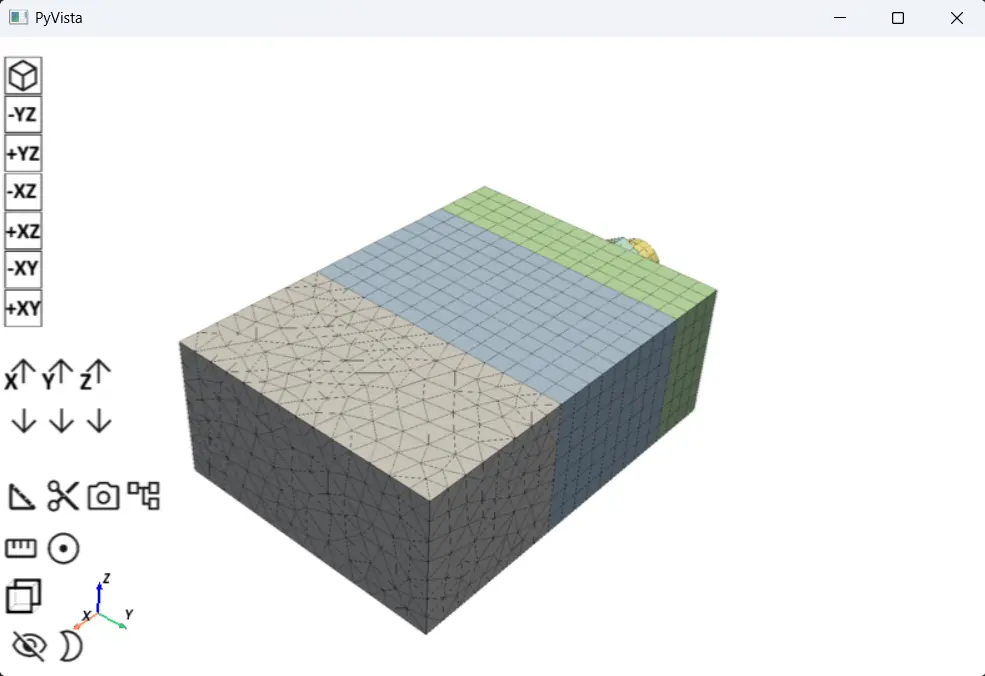
Importing geometry and meshing
geometry_path = r"C:\Users\username\Documents\Valve.pmdb"
app.helpers.import_geometry(geometry_path)
app.plot()  # Inline 3D preview of the imported geometry

Model.Mesh.GenerateMesh()
app.plot(Model.Mesh) # Inline 3D preview of the generated mesh
| Imported geometry | Generated mesh |
|---|---|
 |
 |
Setting up and solving a static structural analysis
Model.AddStaticStructuralAnalysis()
analysis = Model.Analyses[0]

# Apply a fixed support and pressure load via Named Selections
fixed = analysis.AddFixedSupport()
fixed.Location = ExtAPI.DataModel.GetObjectsByName("fixed_face")[0]

pressure = analysis.AddPressure()
pressure.Location = ExtAPI.DataModel.GetObjectsByName("inlet")[0]
pressure.Magnitude.Output.SetDiscreteValue(0, Quantity("1 [MPa]"))

analysis.Solution.Solve(True)
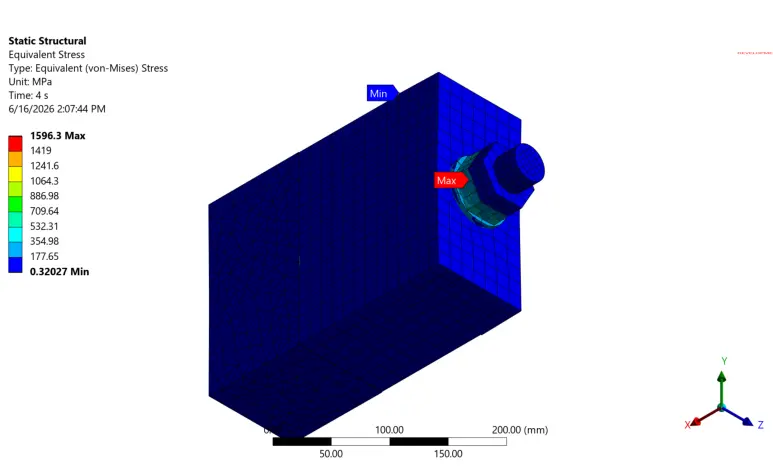
Extracting results and exporting images
stress = analysis.Solution.AddEquivalentStress()
stress.EvaluateAllResults()
print(f"Max von Mises stress: {stress.Maximum}")

result_image_path = r"media/automate-fea-simulations-pymechanical_image_3.png"
# Export the stress result as an image
app.helpers.export_image(stress, file_path=result_image_path, width=800, height=600)

# Display the image
app.helpers.display_image(result_image_path)
app.close()
Opening a locked project
If a project file was left locked (for example after a crash), pass remove_lock=True
at construction or when calling open():
# At construction time
app = App(db_file="project.mechdb", remove_lock=True)

# Or when opening after startup
app.open("project.mechdb", remove_lock=True)
Inspecting the project tree
app.print_tree() prints the full Mechanical object hierarchy with live state icons, useful for
debugging and spot-checking your setup before solving:
app.print_tree()
# ├── Project
# |  ├── Model
# |  |  ├── Geometry Imports (⚡︎)
# |  |  ├── Geometry (?)
# |  |  ├── Materials (✓)
# |  |  ├── Mesh (?)

app.print_tree(max_lines=5)  # Truncate long trees
Launching the GUI from a script
After building a model programmatically, save the project first, then hand it off to the GUI
for visual inspection or manual adjustments with app.launch_gui(). The method opens a
temporary copy of the saved file, so unsaved changes will not appear.
app.save("work_in_progress.mechdat")
app.launch_gui()               # Opens Mechanical GUI; deletes temp copy on close
app.launch_gui(readonly=True)  # Open for inspection without write access
Managing licenses
From Mechanical 2025 R2 (v252) onward, PyMechanical exposes app.license_manager. It lets
you see which license tiers are available, enable or disable specific ones, and control
what gets checked out in automated runs.
from ansys.mechanical.core import App

app = App(globals=globals())
lm = app.license_manager

# List all available licenses in priority order
licenses = lm.get_all_licenses()
print(licenses)
# ['Ansys Mechanical Enterprise', 'Ansys Mechanical Premium', ...]

# Check the status of a specific license
status = lm.get_license_status("Ansys Mechanical Premium")
print(status)  # Enabled

# Disable a license tier so it is skipped during checkout
lm.set_license_status("Ansys Mechanical Enterprise", False)

# Promote a license to the top of the priority list
lm.move_to_index("Ansys Mechanical Premium", 0)

# Activate a specific license for the current session only
lm.enable_session_license("Ansys Mechanical Premium")
print(app.readonly)  # False: the session is active

# Release the session license when done
lm.disable_session_license()

# Print a summary of all license names and their statuses
lm.show()
# Ansys Mechanical Enterprise - Disabled
# Ansys Mechanical Premium - Enabled
# ...

# Restore the default priority order
lm.reset_preference()
The enable_session_license() method also accepts a list when you want to
activate multiple tiers at once:
lm.enable_session_license(["Ansys Mechanical Enterprise", "Ansys Mechanical Premium"])
Remote session (CI/CD or Docker)
from ansys.mechanical.core import launch_mechanical

mech = launch_mechanical(ip="192.168.1.50", port=10000, batch=True)
mech.run_python_script("Model.AddStaticStructuralAnalysis()")
mech.run_python_script("Model.Analyses[0].Solution.Solve(True)")
result = mech.run_python_script(
    "Model.Analyses[0].Solution.Children[0].Maximum.ToString()"
)
print("Max result:", result)
mech.exit()
Summary
PyMechanical lets you script the full simulation workflow in plain Python: geometry import,
meshing, loads, solving, and results. Embedding mode works well for local scripting and
notebooks; the remote session mode fits better on servers, HPC jobs, or in CI/CD. Either
way, you get repeatable, version-controlled simulations without touching the GUI.
It is open source (MIT), so you can install it with pip install ansys-mechanical-core.
Further reading:
